Thursday, June 19, 2025

Summer Desserts in a 9X13 Pan

Here are some good summer dessert options for groups.

Lemon Refrigerator Cake

1 pkg lemon cake mix

1 3 oz box lemon Jell-O

3/4 c boiling water

3/4 c lemon-lime soda (or substitute water)

1 3.5 oz box lemon instant pudding mix

1 1/2 c milk

1 c whipping cream, whipped

Prepare and bake cake according to directions in a 9x13 pan. Dissolve Jell-O in hot water. Gently stir in lemon-lime soda (or water). Chill in refrigerator while the cake is baking. While baked cake is hot, poke holes in it with a fork and spoon cool gelatin over cake. Refrigerate. Beat pudding mix with milk until thick, fold in whipped cream and spread over top of cake. Chill. 

Chessman Banana Pudding

This is pretty scrumptious. The only challenge is finding the Chessman cookies. I've had to make special trips to Walgreens for them.

Recipe here

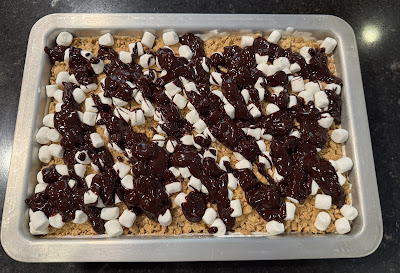
S'mores Poke Cake

The store was out of jarred hot fudge sauce so I made my own ganache heating 1/2 c of cream and stirring in 1 c of chocolate chips.

Recipe here

Chocolate Peanut Butter Dream Bars

Makes an 8x8" pan, can be doubled.

Recipe here

Biscoff White Chocolate Dream Bars

This makes a 9x9 pan. You can buy biscoff cookies and the cookie butter at Trader Joe's. 

Recipe here

Oreo Pudding Poke Cake

1 box chocolate cake mix (oil, water, and eggs)
2 boxes Oreo pudding
4 cups milk
1 package crushed Oreos

1. Make cake as directed in a 9x13 pan.
2. While cake is still semi-warm, poke holes in it.
3. Make pudding as directed on box and pour over cake.
4. Sprinkle crushed Oreos on top.

Reese's Peanut Butter Poke Cake

    1 box chocolate cake mix, plus eggs, oil, and water as directed on the box 

    8 ounces cream cheese, room temperature

    14 ounces sweetened condensed milk

    1 cup creamy peanut butter

    12 ounces cool whip, divided

    12 ounces hot fudge, divided

    8 reese's peanut butter cups, crumbled

Prepare and bake your chocolate cake following instructions on the cake mix box. When the cake is done cooking, poke it all over with a fork. Microwave hot fudge and pour ¾ of the jar on top of the cake so it will soak in.

Beat cream cheese and sweetened condensed milk until smooth. Add peanut butter and continue mixing until thoroughly incorporated. Add half of the cool whip and continue mixing it until smooth. Spread peanut butter mixture evenly over cooled cake. Cover and refrigerate until cool.

Spread remaining cool whip over peanut butter mixture. Drizzle rest of hot fudge over top. Then sprinkle the crumbled reese's peanut butter cups over top. Store in the fridge until ready to serve.


Monday, June 16, 2025

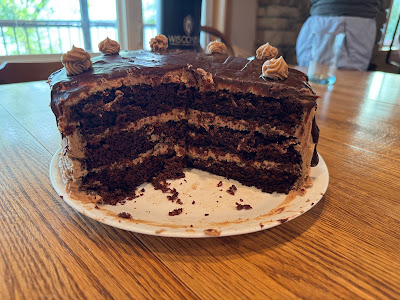
Three Layer Mocha Cake

I baked this cake for Father's Day, and the crew said this was so delicious it needed to be included in the blog.

Recipe here

Notes:

  • I did use cake strips and it helped
  • I did not use all of the powdered sugar in the frosting, maybe about 2-3 c scant of 2 lbs, which is scandalous
  • I made the ganache with melted chocolate chips

Friday, June 13, 2025

Toum- Lebanese Garlic Sauce

One of Andy's volleyball buddies is known for bringing this intense garlic dip/spread to potlucks and people go crazy for it. He said the most labor intensive part is peeling all the cloves of garlic. I noticed there is peeled garlic (sometimes- not all the time) at Costco and decided to make our first batch. 

I used this recipe  and our trusty food processor. Even without peeling garlic, it still takes about 20-25 min to make because of how slowly you need to add the oil at first. I tasted it after making it and it burned by mouth- not at all like I remember, and then I read the fine print at the bottom of the recipe: "It is best to give toum time to rest before serving, so it's a good idea to make it a few days in advance. This will help mellow the garlic flavor." Fortunately, it lasts a couple of weeks in the fridge.

Toum

Source

  • 4 to 5 heads garlic, or 1 1/2 cups peeled garlic cloves
  • 2 teaspoons kosher salt
  • 3 tablespoons freshly squeezed lemon juice
  • 4 cups neutral oil, such as canola or safflower
  • 1/4 cup ice water

  1. Halve the garlic. Peel 4 to 5 heads garlic until you have 1 1/2 cups peeled cloves. Halve the garlic cloves lengthwise and remove any green sprouts. (Note- I didn't do this. I just dumped the whole cloves in the food processor)
  2. Process the garlic and salt together. Place the garlic in a food processor. Add 2 teaspoons kosher salt and pulse until minced and paste-like, stopping to scrape down the bowl as needed, about 10 pulses.
  3. Add the lemon juice. Add 3 tablespoons lemon juice a tablespoon at a time, pulsing to completely incorporate each addition before adding the next. At this point, the mixture should be a very soft paste, smoothie-like in consistency.
  4. Add a drop of oil at a time. Measure out 4 cups neutral oil in a measuring cup with a spout. Take your time here, the whole process of incorporating the oil can take 15 to 20 minutes. With the motor running, use a teaspoon to drop 1 drop of the oil into the garlic. Stop and scrape down the bowl. Repeat processing in the oil 1 drop at a time, stopping and scraping down the bowl between each addition. At first it will seem like nothing is happening.
  5. Add a few drops of oil at a time. Once the garlic begins to look a bit creamy (after about 1/4 cup oil is added), add the oil a couple of drops at a time, stopping and scraping the bowl between each addition. Repeat until an emulsion is fully formed and it becomes thick and spreadable.
  6. Stream in the remaining oil (I found that a funnel inserted in the feed tube of the food processor made this much easier to do without spilling oil). With the motor running, drizzle in the remaining oil in a very slow, thin, steady stream through the tube. After adding 1 1/4 cups of the oil, the sound of the mixing will change and sound like churning ice cream, signifying the mixture is thickening. The final consistency should be light and fluffy, like mayonnaise or whipped cream.
  7. Add the ice water. With the motor running, slowly drizzle in 1/4 cup ice water. Once added, the texture will go from thick and almost gelatinous to smooth and creamy.

Just starting to add drops of oil

Nearly done- most oil added

Wednesday, June 4, 2025

Refinishing a Cedar Chest

This project was germinated by two inspirations- one is a need to store our outdoor furniture cushions at the stuga when not in use. The second is an attempt to mimic the vibe of a rosemaled chest like at the Snyder cabin.

Top of trunk at Snyder cabin

Front of trunk

I purchased a Lane cedar trunk for $30 on Facebook marketplace. It was super heavy when I picked it up, and badly painted. I looked up the serial number on the bottom and learned it was made in 1988 (37 years old), and thus just missed the cutoff date for the Lane chest lock recalls (ie it has a lock release inside in case someone gets trapped). An online description describes it as having wheatfield decorations in front, in a medium oak finish, with deep storage dimensions of 5.8 cubic feet. It was missing the key (I bought one on Ebay for $9.53) and one of its two spring hinges ($7.50).


Someone had spilled paint or something on the lid, and then just painted over it. Gross.
First step was to take off the hardware and try to cut off the little decorative doo-dads on the bottom. I asked Cara to try her little hand-held jigsaw, but the wood proved too thick and tough. Once we'd started, though, I was committed, so I ended up cutting them off with a handsaw (pretty inaccurate and working up a big sweat) and cleaning the inevitable rough edges with my Dremel sanding drum attachment. 

Used my dressmaking curve tool to get a smooth cut line to remove the decorative scroll
Now it was time to strip the black paint. I'll summarize this to say it basically took an entire weekend of multiple coats of stripper and serious scraping elbow grease. The black paint was like glue to get off. It was not fun. 
In between multiple efforts to remove the paint

Another view of the horrible stripping job in case I forget too soon
After stripping and scraping and stripping and scraping and using a lot of mineral spirits, I was left with a surface that no longer had paint, but had areas of old varnish that would not come off. It was time to start sanding, but this is a veneer, so I knew I needed to do it carefully. I did a combination of hand and electric sanding with small grit. 
Before sanding

After sanding, vacuuming and wiping with mineral spirits

After a coat of pre-stain wood conditioner
The pre-stain wood conditioner gave it a darker color right away, and then I followed up with 2 applications of oil based red chestnut stain, applying it with a rag.
Two coats of stain
I then made the rookie mistake of applying a coat of oil-based polyurethane, apparently too quickly after the stain. I'm used to working with water-based products (and it's not like I'm some big expert with those, either). The poly WOULD NOT DRY. I had a fan blowing on it for days. It didn't help that the  weather has been unseasonably cool and damp. Over a week later, in desperation, I wiped it all down with mineral spirits to remove excess poly, then stuck the whole thing in the sun on one of our few dry days. After, it was improved, but still tacky in places so I decided to stick it in the back of the garage for a full 30 days to cure.