Sunday, June 5, 2016

Creating a Photo Collage Pillow


I wanted to make a pillow that celebrated many of the wonderful family vacations we’ve had over the years as a high school graduation gift for each of our kids.  I thought the pillows would be fun reminders and a comfort when the kids were away at college.  Here are the steps I followed to create the matched pair of pillows:

1. Determine the size of the pillow.  I went with a standard 18” square pillow so that I could get two pillows from a yard of printed fabric.  I ordered two inexpensive 18” square pillow forms from Amazon
2. Curate your photos.  My theme was pictures from our various family vacations in which all 4 of us were in the photo.  These were a bit hard to find and I had to dig through a lot of photos- this was a good reminder to me that we should do a more consistent job of asking others to snap a photo so that our entire family can be in the picture.  Gather copies of the photos you want into a folder on your computer so that they are grouped together and easy to upload
3. Determine your collage format.  There are many choices, but I went with a basic grid of 16 photos per collage, 4 by 4.  Your collage format will be influenced by the number of photos you want to use.  I liked the 16 photos version, as this way each photo on the pillow would be about 4.5” per side and a good size for viewing.  I used the free online PicMonkey website to create 2 separate collages (a different one for each side of the pillow).  PicMonkey is easy to use, and they have a lot of information on the site, like this article here:
http://www.picmonkey.com/blog/learn-collage-before-another-butterfly-dies/
4. Important PPI settings:  For printing fabric on Spoonflower, the pixels-per-inch (PPI) ratio is an important function for what size the image will be printed on the fabric.  Spoonflower’s standard for printing fabric is 150 PPI, so if you want panels printed at 18”, you need to create your collage image to be 2,700 pixels by 2,700 pixels.  The formula for calculating print size is:
                           Size in inches you want X resolution (ppi or dpi)= pixels
Note: I did not attempt to include seam allowances in my fabric printing calculations.  I just planned on narrow seam allowances when sewing the pillow.  So, set your size on PicMonkey to 2,700 pixels by 2,700 pixels before you begin making your collage
5. Upload the photos you want to use from the curated folder you created.  Organize the photos into the collage as you like.  PicMonkey lets you zoom and adjust images so that you frame the best portion of your photos.  I was careful not to use photos on the outside edges of the collage that had a person right on the outside edge of the photo- you want to give yourself a little room for seam allowance without sewing through someone’s head.  PicMonkey lets you adjust the spacing between your photos (I used 22) and the color of these gaps in between the photos (I used a dark gray, background color 444444)
6. Once you have your collage photos organized as  you like them, save the collage as a Jpeg file on your computer


7. Now I had to figure out how to create the layout of my two different 18” collage panels to print effectively on a yard of fabric at Spoonflower.  This required me to work on a much larger scale of pixels than usual photo editing software allows.  After searching around, I found this solution:
https://support.spoonflower.com/hc/en-us/articles/204265944-How-to-Create-a-Large-scale-Image-with-Free-Software
I downloaded the free Gimp software and used it to create a layout that would print two each of two different panels on a yard of fabric, for two pillows. Once you manipulate the collages in Gimp as you like them (essentially an image that is 36” by 36” at 150 ppi), save the whole file as a Jpeg
8. Log into Spoonflower, and upload your large Gimp Jpeg image to make one yard of fabric.  One edge of the fabric is actually 42” rather than 36” so you’ll have a bit of a short section of repeat.  Make sure that the layout is good.  I ordered 1 yard of basic cotton, $18.75 with shipping
9. When you receive the fabric, run it through your washer and dryer- it tends to be pretty stiff after the printing process. Here is the fabric before I cut the panels for the pillows:

The printed fabric- four panels for two pillows

10. Iron it on the back side of the fabric, then cut out the panels for your pillow and sew the 4 sides, leaving a big opening on one side to insert the pillow form.  Slip stitch the opening closed.


The pillow displayed on our daughter's 2016 open house memory table

The pillow on display at our son's 2019 open house

Thursday, June 2, 2016

How to Make a Personalized Graduation Book


Many families put out a book that open house attendees can sign when they come to a graduate’s open house, but I wanted family members to have a bit the opportunity to give a bit more time and thought to what memories and advice they’d like to share with our recent graduate.  I made a list of family members I wanted to include in the book, and I sent them all an email 1 month ahead of my intended deadline with the following request:
Dear _____,
In honor of Margaret’s graduation, I am planning on making her a little book with notes from those who love her.
I would like to invite each of you to write something for Margaret.
Here are some ideas:
-- a special memory you have of Margaret
- the most important thing(s) you ever learned
- some things you wished that someone had told you when you were 18
- a favorite quote or poem, and why it is special to you
- things you love and appreciate in life and why
- advice or tips on college and careers
These are only suggestions - anything will work- it doesn’t have to be profound.  It can be as long or as short as you want.
Please send your notes to me via email by April 25.  
I’m going to assemble everyone’s notes, along with some pictures, into a little book and give it to her for graduation.
Thanks a bunch,

It was so much fun to read everyone’s notes as they came in!  I had to remind a few people, but everyone got something to me.  Next, I went through our entire photo collection (this took time, but was a great trip down memory lane) and curated photos of Margaret with each of the family members that wrote a note.  I made folders to organize my photos.

There are many companies that make personalized books, I opted to go with Shutterfly.  I ordered an 8 X 11 hardcover book with 29 pages for $38 (look for discount coupons online- I found a $10 one just before ordering).  It took time to design each page with text and photos, similar to a scrapbooking process.  The process was pretty intuitive to figure out, although I wish the text box features were a bit more flexible- I had to stack text boxes together for longer pieces of writing, but it printed very nicely.  The company delivered it in 1 week, so I had plenty of time before graduation.

The book has been so meaningful for our daughter, and family members told me they really enjoyed writing their notes for her.
The book cover

A page with all pictures

A page with pictures and text
2019 Update:
I did the same thing for our son


Back cover, featuring the three dogs we've owned, Duchess, Sadie and Chester

Hosting a Graduation Open House

Our daughter and her best friend wanted to have a joint graduation open house party, and it was so nice to collaborate with another family- while the party naturally had a larger guest list, there were many hands to share the work, not to mention the highly engaged graduates themselves. As you would expect, the project manager in me decided we would benefit from a detailed plan and schedule. I searched online and didn't find much, so I created my own in Excel, a summary of major tasks are listed here:

Task Suggested time
Develop preliminary list of attendees, including the number who will be receiving printed invitations 4 months
Determine location- your house/elsewhere  4 months
Pick date and time, discuss and set budget 4 months
If applicable, order tables, chairs, tent (we rented from Midway Party Rental and paid for them to deliver, set up, and pick up) 2-4 months
Determine party theme and preliminary food options 3 months
Develop preliminary list of attendees who are likely to attend (drives initial food planning and budgeting).  Try to estimate the number of the graduate's friends who will attend from the inevitable Facebook invites 3 months
Finalize menu, estimated food amounts, sources and costs.  Place orders for food items at more popular venues 2.5 months
Order printed invitations 2 months

Plan any gifts for your graduate 6 weeks
Prepare venue- prep yard, clean house, straighten up garage, etc 6 through 1 weeks
Send invites 1 month
Plan decorations and determine sources and costs 1 month
Prepare picture boards and other "memory table" items (we rented a photo booth) 2-4 weeks
Order customized items, such as customized M & Ms 3-4 weeks
Collect any yard games you'll want to use 3 weeks
Identify serving ware you will use for each type of food, and ways to keep hot food hot and cold food cold, borrow or buy any missing items 2 weeks
Shop for decorations, plates, napkins, cups, etc.  Line up "volunteer" kitchen staff if you can 2 weeks
Finalize backup plan for inclement weather based on early weather predictions 1-2 weeks
Prep camera, assign someone to take frequent pictures 1 week
Clean bathrooms, provide extra TP, soap, towels day before
Set up food serving areas, arranging serving dishes to ensure good flow day before
Put up decorations day before
Cook and/or pick up food day before/day of
Have your graduate start writing thank you notes- the next day


Invitations

Wow that's a lot of bottled water

Plus a ton of milk, fruit and other supplies

Ready for guests!

Scones, bakewell tartlets, cupcakes

Grandpa's "crack" brownies, cookie dough bars, lemon bars, raspberry bars, chocolate peanut butter bars

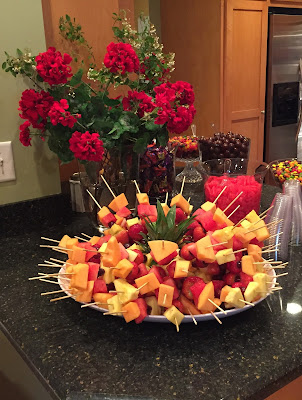
Homemade fruit arrangement

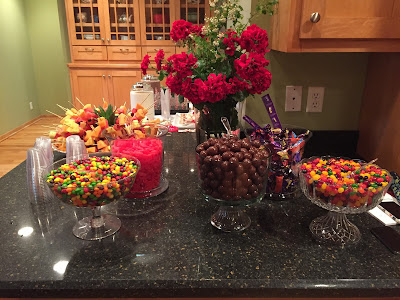
Candy buffet


The "shrine" included the travel pillow (see Here) and graduation photo book (see Here) I'd made her.

Customized M&Ms- Cute, but pricey- $60 for 2 lbs.
The party was so much fun, and everyone had a great time.


Fabulous T-shirt quilt made by Grandma Pam