Wednesday, April 26, 2017

Cocoa Fudge Sundaes

I am a huge fan of the cocoa fudge at Dairy Queen.  It's a perfect blend of dark cocoa and salty goodness.  If you're ever far away from a DQ and need a fix, this recipe will make you very happy.


Cocoa Fudge Sauce
From Bon Appétit, Oct 1991

1/2 cup (1 stick) unsalted butter
1 cup unsweetened cocoa powder
1 cup whipping cream
2/3 cup firmly packed dark brown sugar
1/2 cup sugar
Pinch of salt
Melt butter in heavy medium saucepan over medium heat. Add cocoa and whisk until smooth. Gradually add cream. Stir in sugars and salt. Simmer until mixture is smooth and sugars dissolve, about 3 minutes. (Can be prepared 1 week ahead. Refrigerate. Rewarm by stirring over medium-low heat.)

Makes about 2 cups.
 

Want some ice cream to go with that fudge sauce?  This tastes a lot like DQ ice cream.

Homemade Dairy Queen's  ice cream

1
envelopes knox gelatin
1/4
cup cold water
2
cups whole milk
1
cups sugar
1
teaspoons vanilla extract
1/4
teaspoon salt
1.5
cups cream

Soak Knox gelatin in cold water.
Heat milk to a simmer, but do not boil.
Remove milk from heat, and add gelatin mixture, sugar, vanilla extract and salt.
Cool and add cream.
Chill 5 to 6 hours.
Pour into a 4 to 6-quart ice cream maker, process as per manufacturer's instructions.


Monday, February 6, 2017

Throwing a Theme Party

Throwing a party can be a lot of work, and also a lot of fun.  I like to organize one or two theme parties per year, particularly in the winters when a bit of fun escapism can be so therapeutic for hosts and guests alike.  I find that if I spread the preparation over several weeks, it's more enjoyable and not as stressful.  Here is the theme party planning process I use, with the example of a recent tiki party.


4-6 weeks ahead:
  • Determine theme.  I love this part!  I peruse pictures online and start a Pinterest board of great ideas, decorations, menu ideas, etc.
  • Costume.  Depending on your theme, you may want an outfit that fits the mood.  Plan time for assembling this outfit if you need to.
  • Music.  Music really enhances a party and helps smooth over any gaps in conversation as people settle in.  I don't want it loud so that it drowns conversation, but instead enhances the mood.  Depending on the theme, I usually create a playlist.  For our tiki party, I did some research on "exotica" music and made a playlist including music by Arthur Lyman, Martin Denny and Les Baxter. 
3-4 weeks ahead:
  • Invite guests.  Include information about your theme, and if applicable, encourage guests to come in appropriate dress.  For our tiki party, we encouraged goofy Hawaiian shirts or summer clothes. 
  • Select decorations.  I like to try to use things around the house that we already own, and if necessary supplement with a few purchased decorations.  For our tiki party, I brought in our pink flamingos from their winter storage in the garage and used a table cloth we have with a fruity print.  We made a few decorations (paper lanterns, tiki face cut-outs for our door, green construction paper to make pine cones look like pineapples), and bought a few (I really wanted that grass skirt for our kitchen island).
  • Home setup.  Think about seating- where do you want to place chairs?  Think about lighting, candles, where to put guests' coats, etc.
  • Menu.  My challenge with planning a menu is limiting the options so that you can cook most of them a bit ahead and not be cooking or worrying too much about food during the party.  
  • Cocktails. We always develop, print and frame a themed cocktail menu for these parties- guests love to look at the choices, order and watch my husband (the bartender) mix their drink.  
  • Game- Trivia. We like themed trivia questions, which I develop using online information.  I print out the trivia games in advance and the group plays.  We have a small prize for the winner with the most right answers.
2 weeks ahead:
  • Buy any last decorations
  • Finalize menu
  • Shop for liquor

1 week ahead:
  • Estimate your number of guests, make up your grocery list and shop for non-perishable groceries.
  • Start cleaning your house, sequence cleaning so that the areas that will contain guests are cleaned as close to the party as practical.
  • Start putting up your decorations.
  • Ensure you have enough plates, glasses, silverware, napkins, etc.
  • If you have a freezer with capacity, stock up on extra ice.
2-3 days before party:
  • Ensure your camera is charged and ready.
  • Shop for perishables.
  • Start food prep with those items that can be prepared in advance.
  • Set up your serving table- iron your table cloth, select which serving ware you'll use for each dish, labeling it with a post-it note.  Think about flow for your guests as you set up the serving area. 
  • Finish decorating.
1 day before:
  • Final cleaning. Make sure kitchen and bathrooms are in good shape, have clean towels, plenty of soap and extra TP.
  • Cook or prep any food that can be made ahead.
  • Set up your bar with all non-perishable items. 
  • Set up chairs, candles, etc.
Day of party:
  • Set a serving time for food, plan remaining food preparation to complete at that serve time. 
  • Final set up for your bar- ice, garnishes, etc. 
  • Turn on your music, light your candles.
  • Set out your food at the appointed time.
  • Relax.  Have a drink.  Keep your sense of humor if something doesn't go quite as planned.  Have fun! 

1960s/Mad Men Party (2016)


Tiki Party (2017)


Hawaiian Wedding Cake


80s Party Theme (2017)

Pac-Man Cake


Cassette tape garland
Mardi Gras (2018)


King cake- someone got to find the baby

(The version of this party that we threw for neighbors a couple weeks after the work party was epic and turned out to be one of the best parties of all time)

A Night at the Oscars (2019)

Doing the trivia game

Neighbor version
Saturday Night Live Party (2020)
We did a "soft opening" party for the neighbors on Jan 24, a version for Andy's department (24 guests) on Feb 7, then a version for the volleyball crew on Feb 29 (just ahead of the great Pandemic shutdown). Note the first appearance of the bar cart.


Roaring 1920s (2022)
We used Canva to create a cocktail menu featuring drinks from this time period.
We had Andy's work teammates over. For food, we served meatballs, deviled eggs, takeout Chinese appetizers (Chinese-American food was popular in the 1920s) including egg rolls, cream cheese wantons, and shrimp toasts from Eddie Cheng's in Richfield. I also made a pineapple upside down cake.


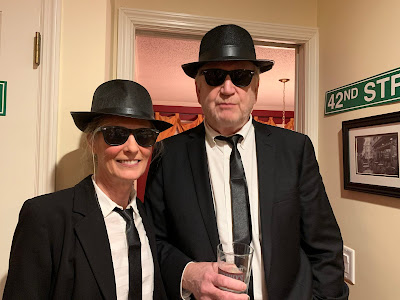
Rock 'N Roll (2023)
We borrowed a karaoke machine from our friend Dave. 

Dressed as Angus Young, singing "Hard to Handle"


Madonna and Angus Young

Neighbors

Saturday, February 4, 2017

Learning Photography- Make a Checklist

We bought a new Olympus E-M5 digital camera, and I've been struggling a bit learning how to use it.  There are so many settings and choices to make that I decided to make a checklist for myself to remember to look at some key settings before I shoot.  This checklist is tailored to our lenses and the location of settings on our camera.


Camera Checklist

1. PRIORITY MODE
P= program/point-and-shoot, camera sets aperture and SS based on subject brightness
Aperture priority- depth of field
Shutter priority- for fast action or blurred motion
Scene- lots of possibilities- portrait, panorama
Art- funky filters to try, including vintage, soft focus, art bracketing allows to select different filters

Info button on back of camera shows/hides info on display
Red button on top of camera is movie- press to record, press to stop
Hitting the OK button brings up the super control panel, touch the item to change on the screen and adjust with front dial

2. LENS:
A short focal-length lens produces greater depth of field than a longer lens
Short lens is 14-42 mm, F of 3.5-5.6
Longer lens is 40-150 mm, F of 4-5.6

3. SHUTTER SPEED
If you wish to capture action you will need to use a fast shutter speed or, alternatively, if you wish to blur motion you will need to use a slow shutter speed.
For sports/wildlife, think 1/4000 to 1/500
Typical is 1/250 to 1/60
To show motion and in low light scenes, think 1/30 or longer

4. F-NUMBER
The f-number controls depth of field (DOF). Small apertures will result in a large DOF, while large apertures (lower f-number) will result in a shallow DOF (blurrier background)

5. EXPOSURE COMPENSATION
Make sure that this is set to zero to begin with.

6. ISO SPEED
Check the ISO setting. You may have been using a high ISO previously. Set the ISO to ‘auto’ or a low value (e.g. 200) to begin with.
National Camera recommends: Outdoors 100-400, indoors with flash 400-800, low light without flash 800-6400

7. AUTOFOCUS MODE / AREA
Hit OK to get to super control panel, can do autofocus with manual adjust

8. HDR-button to top of camera
Four shots are taken, each with a different exposure, and the shots are combined into one HDR image inside the camera.  HDR2 provides a more impressive image than HDR1. ISO sensitivity is fixed to 200. Also, the slowest available shutter speed is 1 second and the longest available exposure is 4 seconds.

9. WHITE BALANCE
Most of the time when shooting outdoors you can use Auto White Balance (AWB). However, you may wish to use one of the set WB settings, such as ‘cloudy’.

10. FILE FORMAT (JPG or RAW, or both)