Sunday, December 29, 2024

Rosemaling

Finished dala horse
It's interesting how tastes change over a lifetime. I never used to like sauerkraut, but I just ordered a Rueben sandwich last night and the sauerkraut and rye bread were SO GOOD. I was never interested in rosemaling. Actually at one point I remember thinking it was overwrought, but here we are years later and I'm suddenly and inexplicably interested. Who can possibly predict these things? 

I have no experience in painting and find the idea intimidating. I found an artist, Lise Lorentzen, who has published a number of instructional videos on YouTube and sells some pattern packets on Etsy. One of her consistent sayings is "don't worry, it's just paint" so I decided to give it a go. Since I had a quiet Saturday and it takes time for paint to dry between coats, before I knew it, I was rotating between painting 4 different projects- the dala horse, an old wooden fish I'd bought a while back on eBay and wasn't sure what to do with, a wooden birdhouse that I was making into another license plate birdhouse, and the base coats on a 12" wood plate for which I'd purchased another pattern packet and paints.

Rotating between 4 projects

12" Dala Horse

Supplies:

I started by lightly sanding the horse and getting a couple of base coats on. Then I used transfer paper to transfer the design onto the horse and started painting. It turned out better than I thought it might, mostly because I'm following an experienced artist's painting suggestions with the transfer.
Unpainted dala

2 basecoats and glaze applied

Held the pattern up to a window to trace a mirror image for the other side

Transfer lines traced, starting to paint

2 coats of scrolls, will add some white in areas then detailing

Birdhouse

Supplies:
  • Acrylic paint, polyacrylic protective finish, old license plate, wire, old silver spoon (all from stash)
  • Wood birdhouse- on sale for $5.40
One of Lise's tricks is to use a hairdryer to get the sticky label off of purchased wooden items- worked like a charm. After a couple of base coats (which take longer to apply because you have to rotate and paint different sides so it can dry properly) I decided to use a couple of the dala horse motifs on the bird house for fun.

Wood fish

I bought this old fish on eBay inspired by some of the painted fish I'd seen in Portugal, but I didn't really have an idea of how to paint it and it sat around for a couple of months. I decided on blue and yellow and gave a go at free-handing it. My c-strokes are a little paltry, but it came out alright.
As purchased

Finished
Finished for the weekend

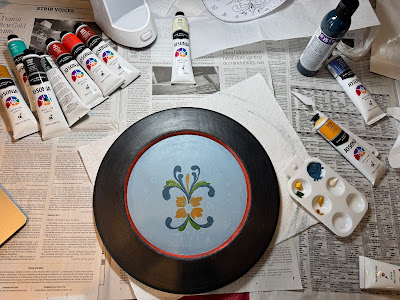
12" Hallingdal-style plate

Supplies: 
Wood plate $5.99 on sale. Pattern packet $7.75 on Etsy.

I got the base coats and glaze on. Painting the red rim was finicky and took several touch ups. I tried to do a burled finish on the outer rim using a folded up plastic bag, but after all it's not really visible. This pattern is ambitious and I'll have to get more courage to continue.

Swedish Almond Cake Pan

This Swedish almond cake pan can also be used for 1/2 recipes of bundt cake recipes- more experiments forthcoming.

This almond cake recipe for Christmas got rave reviews:

Beat well:

  • 1 1/4 c sugar
  • 1 egg
  • 1 1/2 tsp almond extract
  • 2/3 c milk
Add: 
  • 1 1/4 c flour
  • 1/2 tsp baking powder
Add and beat well:
  • 1 stick (1/2 c) melted butter

Grease pan well with shortening and flour it. Place pan on a cookie sheet to catch leaks and bake at 350F for 40-50 min until inserted toothpick comes out clean. (Note: I had to bake for a bit longer, and it was still just a bit under baked in the center- next time try convection bake). I made a glaze of cream mixed with powdered sugar and some almond extract and then topped with sliced almonds.

Thursday, December 26, 2024

Triple Chocolate Cake with Chocolate-Peppermint Filling


This is dad's favorite Christmas dessert. One season I made it three times. You can slice leftovers in portions and freeze them. 

From Bon Appetite, Dec 2001

Filling

8 ounces imported milk chocolate (such as Lindt), finely chopped 

1/2 cup whipping cream 

1 tablespoon light corn syrup 

1/2 teaspoon peppermint extract 

Cake

1 cup sifted all purpose flour 

1/3 cup unsweetened cocoa powder 

1/2 teaspoon salt 

1/4 teaspoon baking powder 

1/4 teaspoon baking soda 

3/4 cup (1 1/2 sticks) unsalted butter, room temperature 

1 cup sugar 

1/3 cup (packed) dark brown sugar 

2 teaspoons vanilla extract 

3 large eggs 

1/2 cup buttermilk 

1 1/2 cups miniature semisweet chocolate chips 

Chocolate Glaze

8 ounces bittersweet (not unsweetened) or semisweet chocolate, finely chopped 

1/2 cup (1 stick) unsalted butter, cut into pieces 

1 tablespoon light corn syrup 

3/4 teaspoon peppermint extract 

12 whole red-and-white-striped hard peppermint candies, chopped 

Fresh mint leaves (I omit these)

Preparation

Filling

Place chocolate in medium bowl. Bring cream and corn syrup to simmer in small saucepan. Pour hot mixture over chocolate; add extract and let stand 1 minute. Whisk until mixture is smooth. Let filling stand at room temperature while cake is baking and cooling.

Cake

Position rack in lowest third of oven and preheat to 350°F. Butter 9-inch-diameter cake pan with 2-inch-high sides. Line bottom with parchment paper. Butter parchment. Dust pan with flour. Whisk first 5 ingredients in medium bowl to blend. Using electric mixer, beat butter in large bowl until light and fluffy. Gradually beat in both sugars, then vanilla. Add eggs 1 at a time, beating well after each addition. Beat in dry ingredients alternately with buttermilk in 2 additions each. Mix in chocolate chips.

Transfer batter to prepared pan. Bake cake until tester inserted into center comes out clean, about 1 hour 5 minutes. Cool cake in pan on rack 5 minutes. Turn out cake onto rack. Peel off parchment. Cool completely.

Using electric mixer, beat filling until fluffy and lightened in color, about 30 seconds. Using serrated knife, cut cake horizontally in half. Place 1 layer, cut side up, on rack set over baking sheet. Spread filling over. Top with second layer, cut side down. Chill filled cake 20 minutes.

Meanwhile, prepare glaze

Stir chocolate, butter, and corn syrup in heavy small saucepan over low heat until melted and smooth. Mix in extract. Cool glaze until just lukewarm but still pourable, stirring occasionally, about 20 minutes.

Pour 1/2 cup glaze over center of cake. Spread over top and sides of cake. Chill until glaze sets, about 15 minutes. Pour remaining glaze over center of cake, then spread quickly over top and sides. Chill until glaze sets, about 1 hour. DO AHEAD Can be made 1 day ahead. Cover with cake dome; chill. Before continuing, let stand at room temperature until softened, about 4 hours.

Sprinkle candies around top edge of cake. Garnish with fresh mint leaves.

Sealing and freezing slices for future enjoyment

Sunday, December 22, 2024

Potica

This is the second year we made potica with our friends across the street. This recipe is from Samantha Kelly and Ashley Leonard in the Iron Range. There is a great video that goes with this recipe.

WALNUT POTICA

We doubled this recipe both times we made it.
DOUGH
  • 2 envelopes dry active yeast
  • ¼ cup warm water
  • 1 cup milk
  • ½ cup butter
  • ¼ cup sugar
  • 1 teaspoon salt
  • 3 large eggs, beaten
  • 5 cups flour (+ extra if needed)
  1. Combine yeast and warm water in small bowl, let sit 5-10 minutes until bubbling and foamy.
  2. Heat milk until small bubbles form around edge and is steaming. Stir in butter, sugar and salt until dissolved. Let cool.
  3. Once milk mixture is cool add yeast mixture and eggs, stir until well combined.
  4. In large bowl add flour and cooled milk mixture. Stir until well combined.
  5. Turn out onto floured board and knead about 10 minutes to incorporate all flour until dough is smooth & elastic. Add more flour as needed if dough is too sticky to handle.
  6. Grease clean, large bowl with butter, cover with damp cloth and let rise in warm place about 90 minutes or until at least doubled in size.
FILLING
  • 2 pounds walnuts, ground
  • ½ cup sugar
  • ½ cup firmly packed brown sugar
  • 1/3 cup butter, melted
  • 1 cup honey
  • 1 cup whipping cream
  • 4 eggs, beaten
  • 1 teaspoon vanilla extract
  1. Combine walnuts, sugar, brown sugar and butter in large bowl, set aside.
  2. Heat cream and honey is small saucepan over medium heat, stirring constantly, until steaming and bubbling around edges. Pour over walnut mixture and stir to combine. Add eggs and vanilla, beat well.
ASSEMBLY
  1. Heat oven to 350°F.
  2. Roll dough on floured cloth as thin as you can possible get it, should be basically see-through, to a large rectangle approximately 36x60 inches.
  3. Warm filling if completely cooled (will be easier to spread).
  4. Spread filling in thin, even layer over rolled dough, extending all the way to the edges. Use an offset spatula.
  5. Tightly roll dough, starting on long edge, like a jelly roll. Pinch edge to seal. Cut into 5 loaves, approximately 12-inches in length. (Loaves do not get a second rise)
  6. Melt 1 ½ tablespoons butter in 9x13 pan. Roll cut loaves in butter to coat.
  7. Baked at 350°F for 15 minutes. Reduce oven temperature to 325°F (without opening oven) and continue baking 45-1 hour until loaves are a deep golden brown. Let cool before cutting. Cooled loaves freeze extremely well
Filling
Starting to roll the dough- clamp the table cloth to the surface
Dough is rolled so thinly you can see the table cloth print
Filling spread on dough

Rolled up and cut into loaves
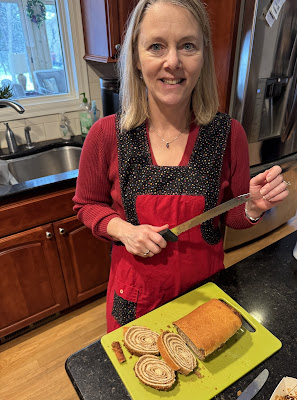
Delicious!
Slicing on Christmas