My family are big fans of cinnamon rolls, so we've tried a number of recipes. Here are our favorites:
The classic yeast cinnamon roll I've been making for years is from a 1998 Ladies' Home Journal magazine:
Cinnamon Rolls
1 pkg yeast
1/4 C warm water (105 F. to 115 F.)
1 C milk
10 Tbsp butter, divided
1 C granulated sugar, divided
2 large eggs
5 to 5 1/2 C flour, divided
1 tsp salt
4 tsp cinnamon
Frosting:
1 1/2 C powdered sugar
1 Tbsp butter, softened
3 Tbsp milk
1/4 tsp vanilla extract
pinch cinnamon
- Sprinkle yeast over warm water, add a pinch of sugar, let stand 10 min. Heat milk and 6 Tbsp butter over medium heat until warm (105 to 115 F.) (butter may not melt completely).
- Combine dissolved yeast, milk mixture, 1/2 C granulated sugar and eggs in large bowl. beat with a spoon until combined. Add 3 C flour and salt, beat until smooth. Stir in 2 C flour, 1 cup at a time, then knead dough 3 minutes until smooth and elastic, adding more flour if needed. Place dough in large greased bowl, cover and let rise in warm place until doubled, 1 1/2 hours.
- Melt remaining butter. Combine 1/2 C granulated sugar with cinnamon in a cup.
- Grease a 15" x 10" jelly roll pan. Punch down dough and roll out on a floured surface into a 20x14-inch rectangle. Brush with 2 Tbsp of melted butter and sprinkle with the cinnamon sugar. Roll up from the long edge and pinch seam. Cut with a serrated knife into 18 slices, about 1 inch thick, arranging them in pan. Brush with remaining melted butter. Cover with wax paper and let rise until doubled, 45-60 minutes.
- Heat oven to 350F. uncover rolls and bake 22-25 minutes until lightly browned. Cool 15 minutes.
- Meanwhile, make frosting by beating powdered sugar and butter in mixer, then adding milk, vanilla and pinch cinnamon. Drizzle over rolls.
For a version using a biscuit-style dough that doesn't require yeast or a rise period, this Cooks Illustrated recipe is great:
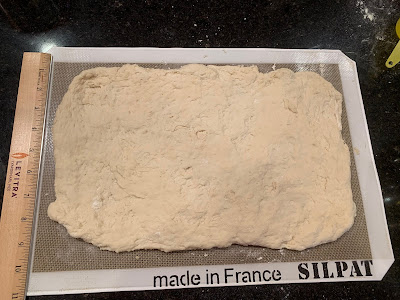
Patting this dough out on a silicone mat makes for less stick and easier clean up.
 |
| Dough patted out |
 |
| I added a little cardamom to the filling- halved filling amount from recipe |
 |
| Rolls placed in cast iron skillet |
 |
| After baking |
This Ginger Cinnamon bun recipe from Penzey's is good:
I've also made a Cinnabon copy-cat recipe:
Version of Cinnabon Cinnamon Roll Dough
1 cup warm milk
2 eggs, room temperature
1/3 cup unsalted butter, melted
4 1/2 cups all purpose flour
1 teaspoon salt
1/2 cup white sugar
1 package yeast (1/4 ounce)
Version of Cinnabon Cinnamon Roll Filling
1 cup brown sugar, packed
2 1/2 tablespoons ground cinnamon
1/4 cup unsalted butter, softened
Version of Spread for Cinnamon Roll Dough
1/4 cup unsalted butter, softened
Version of Cinnabon Cinnamon Roll Icing
3 oz cream cheese, softened
1/4 cup (4 tablespoons) unsalted butter, softened
1 1/2 cups confectioners’ sugar
1/2 teaspoon vanilla extract
1/8 teaspoon salt
Version of Cinnabon Cinnamon Roll Recipe Instructions
Microwave the milk for 45 to 60
seconds. Then, dissolve yeast in warm milk in a large bowl. Add sugar, butter,
salt, eggs, and flour. Mix well. Dust your hands lightly with flour and then
hand knead the cinnamon roll dough into a large ball.
Put the ball of dough into a bowl
that is sprayed with cooking spray. Cover the bowl tightly with plastic
wrap and let rise in a warm place for roughly 1 hour or until dough has doubled
in size. We turned the oven on and then put the cinnamon roll dough on
top of the stove. The heat generated caused the dough to rise.
Once your dough has risen, it’s time
to move on to the next step. In a new, small bowl, combine brown sugar,
cinnamon, and butter. Mix them well. Spray a flat surface with
cooking spray or sprinkled flour. Roll out your dough ball into a 16″ x
21″ rectangle roughly 1/4 inches thick then spread a 1/4 cup of softened butter
on the dough. Next, sprinkle the rolled, buttered dough evenly with the
sugar/cinnamon/butter mixture you prepared in your small bowl.
Roll up the dough starting with the
longer side and cut into fourteen (14) cinnamon rolls (or more smaller rolls,
if you prefer). Place the cinnamon rolls in a lightly greased 11″ x 15″ pan. Cover the dish with aluminum foil and let the cinnamon rolls
rise until nearly doubled, which should take around 30 minutes.
Preheat oven to 350 degree
Fahrenheit. Once your cinnamon rolls have risen, bake them in the
preheated oven until golden brown, approximately 18 to 20 minutes (we used a
professional General Electric gas-range oven at 20 minutes exactly). The
dough should still be soft, though fully cooked, especially toward the center
of the rolls.
As your cinnamon rolls are baking,
beat together cream cheese, butter, confectioners’ sugar, vanilla extract, and
salt for the Cinnabon cinnamon roll icing. The icing should be spread on
your cinnamon rolls when they are still warm, shortly after being taken out of
the oven so that the frosting melts into the cinnamon rolls.
This is reportedly part of the official Cinnabon process according to
some of the employees.
When the cinnamon rolls are still
warm, serve, and enjoy!
 |
| Cinnabon copy cat version |
 |
| Another batch of the biscuit-style |


