Thursday, December 26, 2019

Relish Tray with Peanut Sauce Dip

We love this truly delicious Blender Peanut Sauce from Desperation Dinner:

Blender Peanut Sauce
4 cloves fresh garlic, peeled
2 Tbsp lemon juice (or from 1/2 fresh lemon)
1/2 c. creamy peanut butter
1/4 c. ketchup
1/4 c. soy sauce
1/4 c. brown sugar
2 Tbsp oil
4 tsp minced ginger
1 Tbsp red wine vinegar
1 Tbsp sesame oil
1 Tbsp onion powder
1/2 tsp crushed red pepper, or to taste

Place all in blender and blend until smooth. Makes 1 3/4 cups.

At Christmas, we serve this with veggies.

A double batch freezes into 3 portions that are just right to top zoodles or pasta for 2-3 people.
Double batch, portioned and ready to freeze

Assembling a Bar Cart

A few years back we stayed in an AirB&B condo that had an old-school bar cart from the 60s. We thought it was fun, and it continued to come up in conversations since. I started looking at bar cart pictures, especially on Pinterest, and since I couldn't shake the idea, I decided to buy and set one up for my husband for Christmas. I started by watching for an inexpensive cart on Craig's List, or a utility cart that I could convert into a bar cart, but as I looked at options, none of them were appealing. One issue I couldn't resolve is that most utility carts don't come with side rails to keep your bottles and glasses on the shelves. I started looking for new bar carts online, and they ranged from relatively cheap and ugly to really expensive and ugly. The whole gold rail and mirrors/glass thing didn't fit with our style or décor, and most carts didn't actually offer a lot of shelf real estate- it made no sense to have a cart that could only hold a couple of things.

Google image shopping turned me on to a nice-looking and practical bar cart that was actually offered by Target, the Ronay model, that had three shelves including a removable top tray. It came in three colors and was made of solid wood, not particle board. It was a bit expensive at $304, but at the time I found it, there was a 25% furniture sale for one more day, plus with my son's employee discount and Target Card discount I got it for $157 with tax and free shipping. Nice deal!

The cart arrived quickly, within a couple of days. It's a good thing we come into the house through the garage and that my husband usually misses packages left by our front door, because he didn't notice it when he got home first. I had to wait until he was occupied and then try to sneak the enormous box into the house. The box was bulky, was sitting in snow, and weighted 63 lbs, so I had to wrestle and maneuver it through the door because I wasn't able to lift it. I stashed it behind the dining room table where he wouldn't see it and waited a few days until he was out of the house to assemble it.


The assembly directions where printed on five sheets of paper. I had to identify all of the pieces, including several sizes of bolts, and read the instructions through a couple of times, but over the course of about 90 min and two cups of coffee, it actually assembled nicely and without a lot of confusion. I had to find a hiding spot for the assembled cart, which involved hefting its bulk up a flight of stairs, but I got it safely stashed.

Now, to outfitting it.
We had a number of items already, so I picked up a wooden box to store bar utensils in, a small 4-bottle wine rack from Amazon, and some fun stainless swizzle sticks. I also bought a personalized bar towel off Etsy.

It was a surprise for my husband for Christmas, and we enjoyed using it the first time with guests for Christmas dinner.

Addendum:

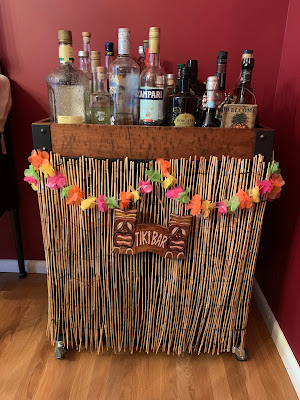
After traveling to Hawaii in June 2022, I was pining for my own "tiki" bar, so I pimped our cart up a bit with a reed screen cut to size and tied on (not permanent).

Wednesday, December 25, 2019

Restoring and Using Vintage Cast Iron Cookware- the Original "Nonstick"

I use our vintage cast iron skillets for most cooking that requires a skillet, and I love them much more than using anything nonstick. I love the flexibility of using cast iron over any heat, going from stove top to oven or broiler, deep-frying, etc. While you really should stick with medium heat or lower for nonstick pans, you can get a great sear on your food with cast iron. They are exceptionally durable- the only thing you shouldn't do with cast iron is create a temperature shock (which can cause cracks, sags, wobbles, pits, and other types of damage), such as putting a hot skillet into a sink of water- always let your cast iron cool before cleaning it. They clean up easily (I clean mine with warm water and a nylon scrubber, then dry well and swipe the inside with a light layer of vegetable oil on a paper towel). We fry eggs in one several times per week. Grilled sandwiches and Dutch babies are delicious.

Vintage cast iron skillets are preferable to modern cast iron- they used a different production method, resulting in thinner and lighter pans, and also included a polishing step which most producers stopped doing in the 1960s. When seasoned adequately, vintage cast iron can be exceptionally smooth, nonstick and easy to maintain. We have some modern cast iron pieces , and I vastly prefer the smooth surface in our vintage skillets better than the pebbly modern surfaces. I also love that vintage cast iron pans come with a history, and you can imagine all of the thousands of meals prepared over the years. We have Grandma Margaret's cast iron skillet- each family got to pick a few things after Grandma passed, and this was the first thing we picked- a great 10" Griswold pan.
Grandma Margaret's Griswold. Based on the logo and no heat ring, made between 1939-1957
We also have a pan my mom found for a few dollars at a garage sale in Duluth, it's about 8.5" in diameter, so it's perfect for frying eggs or grilling a sandwich. We use it so often I just leave it on the stove top all of the time. It has a gate mark, so it turns out it was made prior to 1890!
Gate mark and fire ring on skillet
In fact, really the only things I use a nonstick skillet for is scrambled eggs and crepes. We had a beat up nonstick skillet that I had to throw out because it was warped and its coating was shot. I'm also concerned about the reports of nonstick coating fumes and flakes that have been documented.
Beat up nonstick- I threw it out
You can find vintage cast iron skillets online, at thrift stores or at garage sales. Here are great instructions for stripping and restoring a vintage skillet.

I was able to put these restoration instructions to the test by buying a vintage Wagnar Ware Sidney-O skillet for $20 on Craig's List for my daughter for Christmas. Based on the logo and styling, this skillet was made prior to 1959.
This skillet needs some rehab

Crusty! Quite a bit of carbon build up
I opted to use the oven cleaner soak method rather than putting it in a self-cleaning oven cycle, because there are risks of heat damage and splitting for putting a pan in the oven at such a hot temperature, whereas the oven-cleaner method would involve time and elbow grease but no risk of damaging the pan.

And it did in fact involve some elbow grease.

I sprayed the pan with heavy-duty oven cleaner, wrapped it in a plastic garbage bag and left it in the garage for 24 hours. After each soak cycle of 24 hours, I took it out, rinsed it, and went after the carbon build up with a chain mail scrubber, a steel putty knife and steel wool. It took quite a bit of muscle and scrubbing over the four soaking cycles it ended up needing.
After first soak

After first soak

After second soak

After second soak
After third soak


After fourth soak and hard core cleaning with chain mail, steel wool and Barkeeper's Friend

After fourth soak and hard core cleaning with steel wool and Barkeeper's Friend
To season it, I washed it well with detergent, put it in the oven at 200 for 10 minutes to dry and "open up" then rubbed it all over with Crisco, wiping off all excess well with a clean lint-free cloth. I put it back in the oven upside down at 325 for 15 minutes, took it out and wiped it well with a clean cloth again, then returned it to the oven upside down at 375 for 2 hours. I repeated this seasoning process two more times.
Beautiful! After seasoning three times

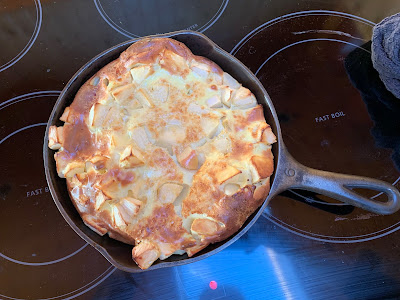
Here is a range-to-oven recipe we love and cook often:

Apple Breakfast Puff


1 Tbsp butter
3 med tart apples,peeled and cut into chunks
4 Tbsp sugar
1/2 C flour
1/2 tsp salt
2 eggs, slightly beaten
1 C milk
grated lemon peel (optional)

Heat oven to 425 F. In a cast iron skillet over med heat, melt the butter then saute the apples until softened, about 10 min. Stir in 2 Tbsp of the sugar and set aside. Meanwhile, in a bowl, combine the flour, peel, salt and remaining 2 Tbsp of sugar. Whisk in the eggs and milk, then pour over the apples in the skillet and bake in the preheated oven for 30 min, or until puffed and golden brown. Serve with syrup if desired, serves 4.

For a savory Dutch baby, see this post.

Bonus round:
I bought a carbon steel wok for my daughter at a local Asian grocery store. It had a scuffed black coating on it that looked like scratched black paint.
New wok with coating
There wasn't a person at the store who spoke English, so I again consulted Google for instructions on how to prep the wok. I learned that carbon steel rusts easily if it isn't coated, so it's treated at the factory before shipping, and you generally have to burn the coating off. I heated the wok over a high flame, and it started to smoke and the coating burned away on the area just over the flame. It took a while as I had to move the wok around so all of the surfaces had been held over the flame for a while, and the smoke detector went off several times even though I had the hood fan on high. Eventually the coating burned off, and I was able to wash the wok and then season it with oil.
Wok after cleaning and seasoning
Dec 2019 update:
Bought a Wagner Ware Sidney-O- No#8-1058 H for Will on Ebay, $38 including shipping. It was in good condition and didn't need restoration.

Sep 2020 update:
I wanted a cast iron skillet to keep in our assigned cabinet at our interval townhouse, so I started looking and found a Wagner Ware size 6 (made before 1959) on Craig's List for $30, plus another smaller unmarked skillet included. I had to drive to Delano to get them, then strip and reseason them, but now I've got another nice one to use, plus the bonus,which turned out to be a #3 BSR (Birmingham Stove and Range) which based on markings was made after 1967, but BSR still used a manual polishing step in production at that time.
New skillets Sep 2020, I didn't go for the 4th soak for the Wagner so there is still a bit of build up on the bottom- no big deal
Update March 2021:
Our son is becoming an avid bread baker, and I wanted to get a dutch oven for him to bake in for his birthday. I'd been haunting the thrift stores and Craig's List for a while and not seeing much. I ended up making an offer on this rusty pot. I knew it was made in Taiwan and not going to be the highest quality piece, but for $20 and some elbow grease I thought I could make it work. In the end, I overpaid and over-drove (the place was in Coon Rapids), but I did come home with this rusty pot.


Yikes. Through a combination of chainmail, steel wool and 50% vinegar solution soaking for several hours, I got most of the bad rust off and did 3 rounds of seasoning.


This is certainly no heirloom piece, but it will bake bread for a college kid, and can be taken camping as well. He tells me he and his roommate have used it to fry both chicken and donuts, as well, so it's seeing some good service.

Update April 2021
I restored this pot for my friend Donna, who'd found it an an antique store a while back. It's gate-marked, and I was able to find some information on the maker, Williamson & Co, evolving to Gibson & Lee Manufacturing out of Chattanooga. It was petty rusty, and there was a build up of minerals on the inside that I couldn't get off despite prolonged and repeated vinegar bath and scrubbing, but the outside cleaned up really nicely.
Before

After

Thursday, December 19, 2019

Tasty Popcorn

We like good stove-top popped popcorn- it tastes MUCH better than the microwave bag stuff that has a chemical taste. I learned how to make good popcorn with this video.

We stick with yellow kernels. I've tried white (bland and small) and this heirloom variety, but didn't like it as much as the regular yellow.
In addition to enjoying regular stove-top popcorn regularly, I occasionally make flavored popcorns. We've had a lot of fun with this cookbook by Carol Beckerman.
By Carol Beckerman
What I like about this cookbook is many of the flavors are pretty easy to put together. If I'm going to add flavors, I often use our old air popper- it can pump out large portions of popcorn easily- the book often calls for 15 cups popped (1/2 C of kernels). Many of the flavors involve melting butter, adding various spices or flavors to the melted butter, stirring it into the popped corn, then baking on two baking sheets for about 15 min.
Making Italian popcorn

Finished Italian-flavored corn
The chili and lime popcorn is one of our favorites from this book.

One of my daughter's favorites, from another source, is this birthday cake batter popcorn. I usually add more popcorn than the stated 6 cups so it's not quite so heavy.


Birthday Cake Batter Popcorn
Ingredients
  • 1-½ cup Melted Almond Bark Or White Chocolate
  • ¼ cups Vegetable Shortening
  • 1-½ cup White Or Yellow Cake Mix
  • 6 cups Popcorn (popped)
Preparation Instructions
Melt the almond bark/chocolate in the microwave. I put it in the microwave in 30-second intervals, stirring between each 30 seconds until it is fully melted.
Add the vegetable shortening to the almond bark/chocolate and stir until it is melted. I usually don’t have to put it back in the microwave to completely melt it but you can if you have to.
Then add the cake mix to the almond bark/chocolate.
Pour the coating onto the popcorn and coat evenly. I use 2 spoons and toss it almost like a salad.
Pour the popcorn out onto cookie sheets to cool/harden. 

Monday, December 2, 2019

Raising the Candle Game- Wet Tile Saw, Scents, Wood Wicks

We've been enjoying the soy candles in bottles I've been making for a couple of years, both at home and to use as little gifts. I've struggled with cutting the bottles with the Dremel I previously posted about, so I found a used table top wet tile saw on Craig's list for $30. I bought a new glass-cutting blade for it and set it up in the garage (good thing, since it sprays water everywhere) and cut some bottles. Cutting round bottles work pretty well and it's MUCH easier to use than the Dremel, as well as yielding a much more uniform cut surface. Unfortunately, square bottles (especially larger ones) don't work well with the saw's blade and guard configuration.

I've had no problem with unscented candles, but Andy wanted to try some scented, so I got an 8-pack sampler of 1 oz bottles (each enough for 1 lb of wax, or one big candle). There are literally hundreds of scents to choose from. I ended up picking campfire, frasier pine, cappuccino, gingerbread, banana nut bread, hot baked apple pie, apple cider spiced rum and warm pear cedar. I marked ounce lines on an old 28 oz tin can as a mixing vessel, and mixed each 1 oz scent bottle with about 20 oz of liquid soy wax (equivalent to about 1 lb by weight) before pouring. Based on the scents so far, without lighting them yet, we think campfire, pine and gingerbread are going to be our favorites.

I'm also trying wood wicks for the first time, along with better formulated cotton wicks, RRD-40. We'll see how this batch works out.
A more uniform cut on this bottle than with the Dremel, or bottle scorer

A little tougher with square bottles you can't spin against the blade- you can see the little jogs where I had to connect the cuts

Scenting this one with gingerbread seemed fitting

Update Oct 2022

I've been putting off cutting bottles as I dread it, but I'm getting more practiced, so it's really not too bad. I just did 12, and all of them "made it." Total time with set up and clearn up was 90 min. Reminders for next time:
  • Wear clothes that can get wet and covered with glass dust. Wear good eye protection (science goggles) and a N95 mask
  • Set up in the garage where everything can get wet. After removing the blade, hose off the tile saw and the water tray that collects glass sludge
  • While cutting, rotate the bottle against the blade, pull back sligthly when you need to change your hand grip. Take your time. Look for any jagged edges after the cut and smooth them with the blade
  • After cutting, rinse each bottle in the utility sink to remove sludge, pat the paper labels dry quickly
  • I dressed the saw blade for the first time using this rubbing stone- I cut through the stone at about 1/3" or so- it seemed to make a difference in how the blade performed. I dressed the blade at the end of the session, so it's ready for next time

Some sentimental bottles- our trip to CA in July '21, Topo Chico from TX in Sep '21,Aquavit from outdoor winter seating at Vikre in Duluth, wine from Meg & Ben's wedding in May
 
I made a total of 11 candles (2 full pour-pots) including a number of Christmas gifts.