Friday, August 2, 2024

Food on Boards

We entertain family and friends pretty frequently, and I've been searching for new ideas beyond our usuals. I stumbled into a trend of serving more than just charcuterie on boards and was immediately intrigued. Of course, many of the pictures are stunning and make you want to try it.


Round serving boards are expensive, so I opted for this 24" diameter ottoman tray at World Market for $45 and gave it two coats of polyacrylic to make sure it's food safe. I also bought two rectangular boards off FB Marketplace (because once I started looking I couldn't help myself). I got a couple of cookbooks from the library and bought a couple.

Chocolate fondue
First up,, I made chocolate fondue (doubling this recipe) with cocoa krispie bars, pound cake from Costco, fruit,, potato chips, marshmallows and shortbread cookies.
Next came the taco board with two kinds of refried beans, rice, corn, etc.
Digging into the taco board
Then came the cobb salad board.
No doubt more to come.
Volleyball viewing party, Nov 2025


Sunday, July 14, 2024

Needle Felting

Needle felted sunset on consignment denim jacket, Feb 2024

I've been sewing clothing ever since I was a young teen, and lately it hasn't been calling to me as a hobby like it has in the past. There are a number of reasons for this:

  • I have a lot of really great clothes already. And ever since the pandemic started in 2020, I've been working mostly from home I don't really take the opportunity to wear many of them
  • Also related to the pandemic, clothing has gotten a lot more casual so there isn't such a need to sew well-tailored jackets for work
  • I can often buy clothing on consignment for less than it costs to get the materials to make it myself
So, it's time for a new hobby. I tried a little bit of needle felting in 2011 after meeting a lovely orthopedic surgeon at a "Fishbone" fellowship orthopedic event in Maine. This surgeon had a busy practice and had adopted a handful of kids, and she woke up at a ridiculous hour (like 4 AM) to do just a little bit of needle felting before starting her busy day. She took my name and address and after the event she sent me a big box full of felting supplies, including some felting needles, various colors of wool and a foam felting pad. What a dear. At the time, I felted a little sheep Christmas ornament, then tucked the box away.

I've decided to try needle felting again because it's portable and can (mostly) be done while watching TV. I ordered a couple of kits, a wool felting mat, needles, and a bunch of colors of loose wool roving from Living Felt. My first project was to needle felt a sunset on a $12 consignment denim jacket. I didn't really know what I was doing, but I had a great time blending the colors. I wet felted it afterwards to help it stay adhered to the jacket. Of course, I had to shorten the sleeves on the jacket, as I frequently do.

Next, I tried some three dimensional needle felting, creating an easter egg bunny and a Santa from a kit. Each figure took about 4-5 hours total, and they were very relaxing to work on.
Santa, in progress
I'd purchased another kit for pumpkins and completed those, learning how to blend wool colors together.
I wanted to felt fruit for arranging in a bowl, so I worked on these 8 pieces, doing all of the design for shaping, colors and blending myself.. I'm definitely getting more confident with being able to get some of the shapes I want. 
Felting with a view of the lake
I completed the apple leaf by felting onto a (dry) disinfecting wipe as a stabilizer.
Ready for Halloween
I followed good instructions and videos from Living Felt to create a copy of Maisy on a denim jacket for Meg. I bought a bunch of different colors of wool to use, then printed a reversed photo of Maisy. I used a Sulky iron on transfer pen to outline the picture and transferred the picture to felt (now right side). I needle felted it, then wet felted it to firm it up. I sewed the felted shape to the back of a jacket, and covered up the sewing with some touch up needle felting (using a little fur from Harriet for authenticity). 
Original photo- Maisy in Luxembourg
Reversed picture outlined with iron transfer ink

Ready to wet felt
Wet felting

Maisy approves
I knit the scarf using #1 needles
The bases are sawed from a branch I picked up in Two Harbors

Camper. I both needle and wet-felted the beads for the fire ring

Dala horse
A while back I bought this autumn leaves kit from Living Felt, along with some super bubble. I bought a couple of palm washboards from Heartfelt Silks in Bayport.
Finished felt
Leaves cut from felt
I crocheted these acorn caps
Moose
Sheep pin cushion
Ready for St Patrick's Day
Dala horse onto purchased tote- one for me, one for a friend


Monday, July 1, 2024

Graham Cracker Pie Crust

This has been my go-to for years, from the Better Homes & Gardens Cookbook.

  • 1/3 cup butter
  • 1/4 cup sugar (I usually halve this)
  • 1 1/4 cups graham cracker crumbs (9 rectangular sheets or 18 square crackers)

Preheat oven to 375. Melt butter in pie pan in oven- watch carefully so it doesn't burn. Process crackers in food processor to turn them into crumbs. Add crumbs and sugar to the melted butter in the pie pan and mix then press into bottom and up sides. Bake 5 min, then cool.

Wednesday, June 19, 2024

New Raised Garden

New garden, finished June 16
In the last few years we've had neighbors build nice raised and enclosed gardens, and as the wood surrounding our old raised bed was starting to rot away Andy was developing garden envy. He decided to build one, and designed it using graph paper. 
He had two pallets of cement blocks and lumber delivered on April 24, and told me not to worry, he would plug away at this gradually over the summer. 

Since he was busy coaching boys volleyball, the project did putter along. I think the neighbors were relieved when the last of the solid cement blocks was finally moved to the backyard (the old wheelbarrow took a beating). It took Andy a while to get a flat surface to start laying the blocks, on top of gravel and sand. Levels and string played a part.
May 5th
May 18th
May 26, Will gets pressed into service before the Timberwolves playoffs game
Andy had 2.5 yards of compost/manure delivered, while we were camping May 25. The shoes he was wearing after hauling that back had to be thrown away.

Then on Memorial Day weekend, as we were getting back from camping, he really caught fire. I was strongly encouraged to get going on staining all surfaces of the 16 boards for the project, with two coats, which took some time.
Painting boards, May 27
Even though he originally thought this year we wouldn't get to have a growing season, it wasn't long before he stopped at the nursery and got seeds and starters.
May 30, Garden is planted, temporary chicken wire to protect plants
We picked up a piece of cattle fence to serve as a trellis at the Tractor Supply in Little Falls and lashed it to the roof. We got it on sale because it had been cut in half (which just happened to be the size we needed.)
June 7, 15 min before store closing
Then it was time to install the wood. This was done entirely with hand tools, except the old powered drill left behind in the cabinet from the previous owner at the harbor. Yet another trip to Menards to buy a gate.
June 11
The following weekend we attached fencing to the wood, and installed the gate, both were two-person jobs. I hammered the post caps on and did clean up.
Yay! Finally done

Materials

Blocks and lumber with delivery from Menards $770, plus additional supplies (sand, paving gravel, tubes of cement epoxy, 4X4 stakes) at $127. 

Stain $42 (2 qts). Stain type: Pittsburg Stain+Sealant in color California Rustic

Fencing $60

Pavers, additional sand, post caps, additional blocks $169

Dirt 2.5 yards for $340 including delivery

Gate $116

Trellis $16 (First time shopping at Tractor Supply in Little Falls)

Total $1640

We decided to plant bee balm in the 18" gap between the garden and the garage- raspberry wine in the center and two Monarda Hybrid Pink Lace on the sides. We hope they're going to fill in.

Rhubarb

We used to grow rhubarb, but our plant died and as our lot is so shady, we have never replaced it. This year my mom gave me about 5 pounds of her rhubarb.

I made this Smitten Kitchen rhubarb snacking cake. It's quite good.

Rhubarb snacking cake

Rhubarb Pudding Cake

This is a classic my mom and I have been making for many years.
  • 1.5 lbs rhubarb, cut into 1/2" dice, about 4 1/2 c
  • 2 c flour
  • 1 1/2 c sugar
  • 2 tsp baking powder
  • 1/2 tsp salt
  • 6 Tbsp melted butter
  • 2/3 c milk
  • 1 tsp vanilla
  • 1 egg
Topping
  • 1 c sugar
  • 1 Tbsp cornstarch
  • 1/2 tsp cinnamon
  • 1 1/4 c boiling water
Directions:
Preheat oven to 350. Grease a 9X13" pan. Scatter rhubarb in pan. Sift flour, 1 1/2 c sugar, baking powder and salt. Beat in melted butter, milk and vanilla, scraping bowl. Beat in egg. Batter will be thick. Drop batter over rhubarb by heaping tablespoons, then gently spread evenly to edge, covering rhubarb. For the topping, combine the first 3 ingredients and sprinkle over the batter. Gently pour the boiling water over all. Bake about 50 min, until a toothpick comes out clean.

Rhubarb Pecan Oatmeal Bars

Ingredients
  • 1 1/2 c. all-purpose flour
  • 1 1/2 c. old-fashioned rolled oats
  • 1 c. firmly packed light-brown sugar
  • 1/2 tsp. ground cinnamon
  • 1/2 tsp. salt
  • 3/4 c. butter (1.5 sticks)
  • 1/2 c. chopped pecans
  • 2 c. Chunky Rhubarb Sauce (see below)

Directions

  1. Heat oven to 375 degrees F. Lightly coat a 13- by 9-inch baking pan with cooking spray.
  2. In a medium bowl, combine flour, oats, brown sugar, cinnamon, and salt. Add butter and stir with fork until mixture resembles coarse crumbs.
  3. Press two-thirds of crumb mixture into bottom of pan. Spread thickened sauce evenly over crumb layer. Top with remaining crumb mixture and pecans.
  4. Bake until top is golden and rhubarb sauce bubbles -- 25 to 30 minutes. Let cool on wire rack to room temperature. Cut into 16 pieces and store in airtight container for up to three days.

Chunky Rhubarb Sauce

This sauce is delicious served over ice cream or pound cake.

Yield: 3 1/2 cups

Ingredients

  • 2 lb. rhubarb
  • 3/4 c. sugar
  • 1/3 c. fresh-squeezed orange juice
  • 1 tsp. grated orange rind
  • 1/4 tsp. ground nutmeg
  • 1/4 tsp. salt

Directions

  1. In a 4-quart saucepan, combine rhubarb, sugar, orange juice, orange rind, nutmeg, and salt. Bring to a boil.
  2. Reduce heat to low, cover, and simmer until thickened -- about 15 minutes.
  3. Cool to room temperature. Refrigerate until ready to use.

To use it in the bars, thicken it: Mix 2 tablespoons cornstarch with 3 tablespoons water and stir into rhubarb mixture. Cook, stirring, until sauce is clear and thickened.

Rhubarb Crunch

  • 1 c flour
  • 3/4 c oatmeal
  • 1 c packed brown sugar
  • 1/2 melted butter
  • 1 tsp cinnamon
  • 4 c diced rhubarb
  • 1 c white sugar
  • 2 Tbsp cornstarch
  • 1 c water
  • 1 tsp vanilla
Directions:
Preheat oven to 350 and grease a 9X9" pan. Combine flour, oatmeal, brown sugar, melted butter and cinnamon. Press half this crumb mixture into pan, top with rhubarb. In a saucepan, combine white sugar, cornstarch, water and vanilla. Cook until thick. Pour over rhubarb. Top with remaining crumbs. Bake for 1 hour. Serve with ice cream. 

Rhubarb Syrup

From the True North Cabin Cookbook by Stephanie Hansen
  • 4 c chopped rhubarb
  • 1 c white sugar
  • 1 c water
Combine in a saucepan and bring to a boil. Lower heat and simmer, stirring occasionally, until rhubarb is soft, about 15 min. Strain liquid into a jar and reserve solids as a rough jam.

Rhubarb Gin & Tonic

  • 2 oz gin
  • 2 Tbsp rhubarb syrup
  • tonic
  • Fresh rosemary or thyme sprig as garnish
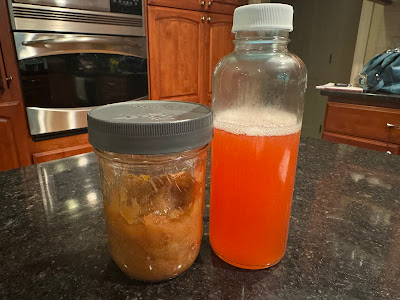
Rhubarb syrup and rough jam
Rhubarb Shrub

1 lb rhubarb, diced

3/4 c granulated sugar

1/2 c water

1/2 cup white wine vinegar

Directions:

Combine rhubarb, sugar and water in a small saucepan over med-high heat, stirring as rhubarb starts to break down. When mixture boils, reduce heat to low and cook until rhubarb is completely broken down into strands, about 10 min, stirring occasionally. Position a fine-mesh strainer over a bowl and pout the mixture in, allowing it to strain about 30 min. Discard solids. Allow syrup to cool to room temp, add vinegar. Store in refrigerator.