Sunday, August 22, 2021

Using a Generator


We purchased a pre-owned and refurbished Honda eu200i generator at Fleet Farm over two years ago for $729 as a risk management strategy for maintaining extremely expensive insulin in the refrigerator during prolonged power outages, running the sump pump if necessary, and maintaining the upright freezer filled with food. We haven't used it once since we bought it, so it's past time to figure out how to use and maintain it, and possibly use it for the occasional boondocking foray. Most RV air conditioners exceed the capability of many portable generators, but since our 2021 T@B has an Elwell Air8 AC (starting current 15 amps, operating current 9 amps; power consumption 900 watts), this model will work.

The gas tank capacity is 0.95 gallon, and it will run 3.4 hours at stated load, and 8 hours at 1/4 load.

The manual is 75 pages, which is fairly overwhelming.

At 47 pounds, it's not easy to maneuver around. Safety guidelines dictate it shouldn't be used within 20-25 feet of any inhabited area. We've heard a number of stories of generator theft, so I did buy a heavy chain and lock to use with it (yes- bolt cutters could get through the chain in seconds, but it will prevent a carry-off from someone not equipped with bolt cutters).

The specs are 2000 starting watts (16.7 amps) and 1600 running watts of power, producing 13.3 amps. A single 0.95-gallon tank will run up to 8.1 hours. You have to make sure that you're using the right kind of extension cord- one that is rated for the load, in this case up to 2,000 watts.

Key appliance requirements:
  • Wayne sump pump WSS30V- 120V, 10 running amps=1,200 watts (this is the primary pump, not the battery-powered secondary pump which runs on the 12V battery)
  • Microwave-1000 watts
  • LG fridge- 5.2 amps, 115V= 598 watts
  • Capresso coffee maker- 1000 watts
  • White Westinghouse freezer- 5 amps, 115 v= 575 watts
  • Estimates for laptops= 20-75 watts
  • Estimates for cell phone charging= 10 watts

Steps for starting:

  1. Add fuel- regular unleaded with octane 86 or higher, 10% or less ethanol is acceptable
  2. Check oil level by unscrewing the maintenance cover- it should be at upper limit of oil fill neck. Use SAE-10W30
  3. Turn choke on (also known as closing it) by moving it towards the red arrow (if restarting a warm engine, leave choke open)
  4. Open fuel vent
  5. Make sure ecothrottle switch is off
  6. Turn engine switch on
  7. Pull starter grip to start
  8. Open choke
  9. Run 2-3 minutes before connecting any appliances
  10. Turn ecothrottle switch on if warranted (minimizes generator production to match what is being drawn) unless high electrical loads are being used simultaneously or powering appliances with sudden and high start up loads
  11. Disconnect/turn off any appliances before turning off generator
  12. Remove excess gasoline with a siphon for storage (remove the fuel filter before siphoning). Close fuel vent
Maintenance starts on page 36 of the manual

A few helpful videos:

Fajitas

Fajitas are quick to put together, and you can use leftover meat, as well.

You can marinate meat in some of the sauce prior to cooking, but I often just sauté the meat quickly over high heat (you want a little sear- use that cast iron, of course), add in onions and peppers for a minute to get them started, then add the sauce and stir until all is hot.

Here are two versions of fajita sauce we like:

Fajitas in a Flash sauce

Modified from the "Desperation Dinners" cookbook

1/3 c red wine, beef broth, or water

1 Tbsp molasses

1 Tbsp Worcestershire sauce

1 Tbsp lemon juice

2 Tbsp lime juice

1-2 cloves garlic, minced

1/2-1 tsp taco seasoning


This one includes some A1 sauce, again modified here:

1 clove garlic, (minced)

1 tsp coarse sea salt

1 Tbsp ground cumin

1/2 tsp chili powder

1 Tbsp oil

1 Tbsp lemon juice

1/3 cup A.1. Original Sauce

Baked Beans

I've previously published my Grandma Jeanne's baked beans.

Grandpa Tom is known for making great baked beans. He describes the nuance of judging the right amount of water to use based on the age/hardness of the beans- you have to check them occasionally and possibly add a little water as you go. Here is his method.

Grandpa Tom's Baked Beans

2 lb dried Great Northern beans

1/2 lb bacon, diced, fried and drained or chopped salt pork

1 onion, chopped

1/3 c molasses

1/2 c brown sugar (Andy uses closer to 1/4 c)

Andy also adds 1 Tbsp liquid smoke

Soak beans overnight. The next morning, add beans to a slow cooker with the other ingredients and water to cover by about 1/4 inch, or a thick soupy stir with a wooden spoon. Cook on high for about 6 hours, checking the water level and tenderness of the beans periodically.

Here is a recipe from Rancho Gordo that uses the oven and yields great baked beans, also suitable for vegetarians and vegans:

New England Style Baked Beans with Yellow Eyes

(Makes 6-8 servings)
1 pound Rancho Gordo Yellow Eye beans, soaked for several hours or overnight and then simmered for one hour until just beginning to soften
2 teaspoons dry mustard
1 tablespoon tomato paste
1 teaspoon salt
1/3 cup molasses
¼ cup brown sugar, lightly packed
2 tablespoons maple syrup
½ of a large onion, sliced thinly

Preheat oven to 250 degrees F. Drain cooked beans, reserving the bean broth. In 2 cups of the bean broth (supplemented with water if necessary) whisk together the mustard, tomato paste, salt, molasses, brown sugar, and maple syrup. Put half the beans in a large, heavy Dutch oven and top with half of the sliced onion. Add the remaining beans and top with the remaining onion. Pour the broth and seasonings over the beans, cover and bake for 5 to 7 hours, stopping and checking occasionally to make sure all the liquid has not evaporated. Add more water as necessary, but not too much, because in the end, you want a thick, sweet sauce clinging to the beans. It shouldn’t be watery. Add salt and pepper to taste.

Thursday, August 19, 2021

Roxann's La Bête Noir and Pear Tart

 Our long-time family friend Roxann once owned a production bakery (selling to hotels and restaurant clients) in the 1980s. While a high percent of the bakery's sales was comprised of French bread, she made a few (tremendous) desserts. I've made both of these a number of times:

La Bête Noir torte (The Black Beast)

Use high-quality chocolate

8 oz unsweetened chocolate

4 oz semisweet chocolate

8 oz (2 sticks) unsalted butter, softened and cubed in small pieces

5 eggs, room temperature

1 1/3 c sugar, divided

1/3 c water

Preheat oven to 375. Spray and flour a 9" round cake pan, and put a parchment circle in the bottom.

Melt both chocolates together slowly over very low heat, or in microwave. Once melted, add butter off heat and stir to melt/combine.

Beat eggs with 1/3 c sugar until tripled in volume.

Bring 1 c sugar and 1/3 c water to a complete boil in a saucepan and boil just until sugar is dissolved, no longer. Pour this hot syrup over the chocolate/butter mixture and stir until smooth and shiny. Gently fold in beaten egg mixture, pour batter into prepared pan. Carefully place this pan into a larger pan with enough water in it to come up about 1/2" on the sides. Bake 28-33 minutes- center will still be soft. Cool, then refrigerate until quite firm. Run a knife around the edge of the pan and invert onto a platter. Cover and refrigerate (or freezes well) until serving.

Pear Tart

1 buttery tart crust, prepared in a 9" tart pan with removable bottom, parbaked until very slightly golden (about 10 min)

3/4 c sugar

1/3 c flour

1/4 tsp salt

3 eggs

6 Tbsp melted butter

1/2 tsp vanilla or almond extract (go almond here if you can)

3-4 ripe pears, depending on their size, preferably anjou or bosc

Preheat oven to 350. Peel pears and cut them in half lengthwise, removing core. Squeeze or rub a little lemon juice on the surfaces. Slice them in 1/4"-3/8" slices crosswise and fan out in the crust with the wider end of the pears near the edges of the pan. For filling, mix dry ingredients, then whisk in eggs, then butter and extract. Pour the filling over the fanned pears and bake about 35 minutes, or until tart is crusted and browned.

Friday, August 13, 2021

Let me tell you how I really feel about cake rolls

I've had a number of bad experiences with cake rolls. Today's failure has now put my solidly in the anti-cake-roll camp. Down with cake rolls!!!!

Certain family members are big fans of cake rolls. I recently bartered help with my son, and his end of the barter request was yet another Ho Ho-style cake. I'm not a big fan of the taste and texture of the filling in this one I've made, and was advocating for a cake that has decent (i.e. real) filling ingredients. He insisted, however, that vegetable shortening must be included in the filling to get that "authentic Ho Ho taste," and he did a search to find this version online. "Whatever," I said, "you want a cake filled with Crisco. I'll make it."

But I was going to be smart about the cake roll portion, or so I thought. I decided to use this recipe from a reliable source. I followed the instructions, separating and beating eggs for many minutes. I baked it for the stated 15 min, then added an additional 2 minutes despite the warning "DO NOT OVERBAKE!!!" The top was solid and sprang back when touched, as directed. The edges looked cooked through.

I flipped it out, and it was mush. Underbaked mush. And you can't put it back in the oven once it's out and spreading loosely over a tea towel. 

Swearing ensues

You just get out a knife and scrape up the muck into the garbage and try to keep the swearing to a relative minimum.

#$%& cake roll scraped up and about the hit the garbage

OK, I thought. I've been stung too many times with cake rolls (including a failure just last Christmas with the frequently requested Gingerbread cake roll). No more with the separating eggs crap. Let's do this with a cake mix, and let's OVERBAKE it. Yeah- let's overbake the HELL out of it.

I found instructions on using a cake mix for a cake roll, involving 6 eggs. I baked this for 17 minutes (again, longer than directed), and when it came out at least it was baked through. 

I proceeded to roll it up and let it cool for 2 hours. When it came time to unroll and fill it, it stuck to the rolling parchment and platter, it broke and cracked, and was just generally ugly and naughty. I slapped some chocolate on top, which covered some of the cracking, and called it a day. The taste is only OK- I'm not a fan of the filling but Will claims to like it. My debt is paid.

If you're feeling lucky, or just plain masochistic, here is the Gingerbread Cake Roll frequently requested at Christmas. When it manages to come out, it really is delicious.

Gingerbread Cake Roll

Adapted from Bon Appetit

3 large eggs, separated 

1 tablespoon butter, melted 

1/2 cup molasses 

1/4 cup sugar 

1 cup all-purpose flour 

3/4 teaspoon baking powder 

3/4 teaspoon baking soda 

1/8 teaspoon salt 

1/2 teaspoon ground cinnamon 

1/2 teaspoon ground cloves 

1/2 teaspoon ground ginger 

2 tablespoons powdered sugar 


Spiced Cream Frosting

1 1/2 cups whipping cream 

1/3 cup sifted powdered sugar 

1 teaspoon cinnamon 

1/4 teaspoon ground cloves 

1 teaspoon vanilla extract 

1.Line a greased 15 x 10 inch jellyroll pan with waxed paper; grease and flour wax paper. Set pan aside. 

2.Beat egg yolks at high speed with an electric mixer until thick and pale. Gradually add butter and molasses, beating until blended. 

3.Beat egg whites at high speed until foamy. Gradually add sugar, 1 tbls. at a time, beating until stiff peaks form and sugar dissolves (2-4 minutes). Fold egg whites into yolk mixture. 

4.Combine flour and next 6 ingredients; gradually fold flour mixture into egg mixture. Spread batter evenly into prepared pan. Bake at 350F for 8-10 minutes (This is a LIE- bake for at least 20-25 minutes!) or just until cake springs back when touched lightly. 

5.Sift powdered sugar in a 15 x 10 inch rectangle on a cloth towel. When cake is done, immediately loosen from sides of pan, and turn out onto sugared towel. Peel off wax paper. Starting at narrow end, roll up cake and towel together; cool completely on a wire rack, seam side down. 

6.Unroll cake; spread with half of Spiced Cream Frosting carefully re-roll. Place on a serving plate, seam side down. Spread remaining Spiced Cream Frosting on all sides. Pull a fork or an icing comb down length of frosting. Cover loosely, and chill until ready to serve.

Thursday, August 5, 2021

Grandma Jeanne's Beans

 My grandma Jeanne made great baked beans, and received numerous requests over the years to bring them to picnics and events. She wrote the instructions for me in 1994, after one of these events. My mom was craving them and recenty made a batch.

My mom made the recipe, using an Instant Pot. She used navy beans instead of great northern. She sauted the bacon in the IPot, then added the reamaining ingredients, including the soaked beans and 3 cups of water. She cooked them on high for 40 minutes, but they weren't quite done so added another 10 minutes.
Overnight soak

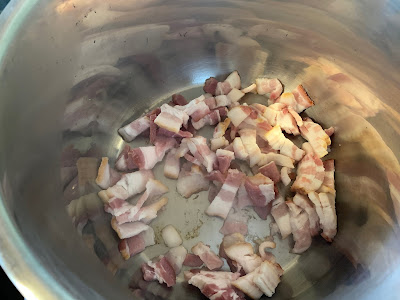
Cooking the bacon

Ready to cook
Yummy